I know I need to finish that owl pillow. It sits on my desk and I stare at it as I stream videos on my computer from Netflix and it basically screams at me to pick it up and finish it...I know I don't really have all the much more left to do, but all the fun parts are done and now all I have left to do is sew it together to make it look like a pillow. How do you find the motivation to complete a project when all the exciting parts are done?
-M
Thursday, April 15, 2010
Monday, April 5, 2010
Everything is better when it's personalized...
When my sister was getting married she asked me to be her Maid of Honor and so I felt that anything I did had be absolutely be more original than anyone else. So much pressure! I knew that I wanted to personalize a wood serving bowl for Anne & Chuck by burning a recipe on the rim of it and so my quest began to find a wood serving bowl with a wide enough edge and a recipe small enough to fit.
I ended up finding the bowl at Crate & Barrel and found a salad & dressing recipe that would fit. I bought a wood burner and used the pointed tip to produce clear lettering and practiced on a scrap piece of wood before beginning on the bowl. Overall, it was a fairly easy craft and I think it's lovely.

I also made some paper flowers, these are a few of them.
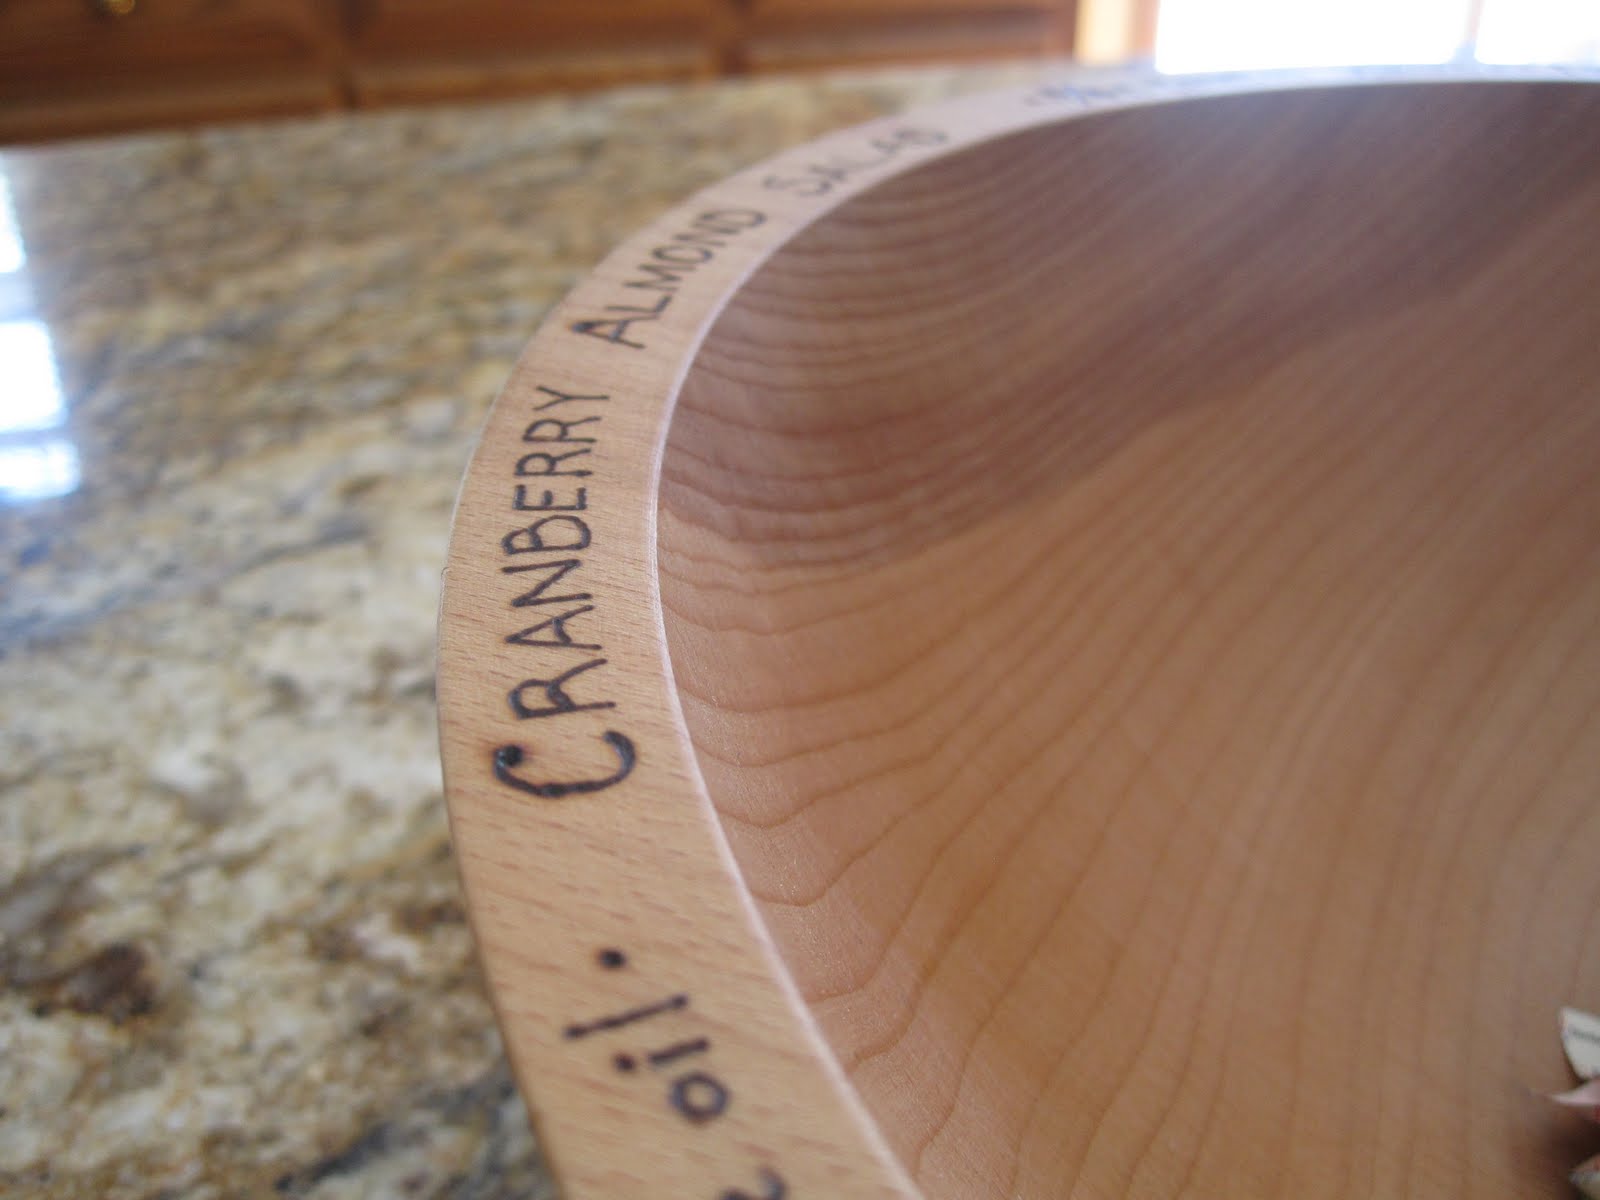
The 'c' in the word cranberry was the first letter I wrote and is a little wobbly.


Another close up.

I learned how to make these Kusadama flowers here.
For the flowers I used a world map since Chuck is a trained pilot and specifically I used the area around Italy since that is where Anne would like to go.
-Meg
A bit late for Easter...
I suppose I should have put this up before Easter, but now you have something to think about for next year or if you just like doing little bunny projects. Last Friday our friend, Jamie, came in to work with some goodies her mom had mailed her for Easter and one of the things she got was a little candy bunny that they had made years ago and have kept around ever since. That's some serious willpower because I would have eaten the chocolate kiss immediately.
To make this you will need:
Plain white paper
Hershey's kisses
Black felt tip pen or thin Sharpie marker
Pink Crayon
Ribbon, twine, etc...for the tie
3/8" wood bead
Small white pom
Glue

Quick, easy, and super cute. I hope you had a happy Easter!
-Meg
To make this you will need:
Plain white paper
Hershey's kisses
Black felt tip pen or thin Sharpie marker
Pink Crayon
Ribbon, twine, etc...for the tie
3/8" wood bead
Small white pom
Glue

Use the white paper to cut out 2 ears, color the middle with the pink crayon, fold in half to crease and then glue into the top hole of the wood bead. Use the pink crayon to create the bunny cheeks. Use the Sharpie to draw in the rest of the face. Glue the head to the Hershy's kiss. Glue the white pom to the back on the Hershey's Kiss. Use the ribbon or twine to create a bow.
Fini!
Quick, easy, and super cute. I hope you had a happy Easter!
-Meg
Monday, March 22, 2010
a vintage birthday...
Lately everywhere I look in the blog world I have seen those little vintage inspired pendent banners. So I thought it was about time I made something incorporating this fun little touch. Scott’s Grandma’s birthday was coming up giving me the perfect opportunity to add a vintage touch to her birthday card. Since she is a fellow crafter I knew she would appreciate it. So here is what I came up with….
The front of the card is the pendent banner. I thought about adding more to the background with colored circles or something to that effect, but in the end I stuck with the simplicity of the muted toned banner. My favorite part being the touch of red in the string!


The front of the card is the pendent banner. I thought about adding more to the background with colored circles or something to that effect, but in the end I stuck with the simplicity of the muted toned banner. My favorite part being the touch of red in the string!

For the back I found a vintage photograph (I believe it is Shirley Temple) of children blowing out candles and printed it on an off white linen paper; giving it the perfect aged look. Then I wanted to bring in the red touches again so I sewed a border around the picture. Last I pulled in some of the colors form the banner by adding a personal message, and of course I used a vintage typewrite font!

I must admit well making this card I asked myself multiple times how would Meg add a vintage touch to this and that is where I got the idea for adding red string and sewing a border around the picture- Thanks Meg you are my inspiration :) All in all I am pretty happy with the results. Enjoy ~ Julie
Thursday, March 18, 2010
Owls taking shape...
I've had the owls finished up over the weekend, but I never posted them. Here we go...
First I finished sewing on the wings on and face of the small owl. At first I couldn't decide if I wanted to go with a bright orange beak (because I am partial to bright orange), but I'm very happy now that I decided to go a neutral color instead. I think he looks very darling.


First I finished sewing on the wings on and face of the small owl. At first I couldn't decide if I wanted to go with a bright orange beak (because I am partial to bright orange), but I'm very happy now that I decided to go a neutral color instead. I think he looks very darling.

hoot.
From there I started on the second owl. I used a dark grey fabric with a lighter grey casual flannelwear fabric for the wings. It's very lightly striped with purple. These eyes were a little trickier to sew since the pupils were larger and you could easily tell if it wasn't a circle. It while while sewing this owl on and sewing the eyes that I sewed it to my pants. Hahahahahaha, oops.

Staring contest.
I finished the owls! Great success. I think my favorite part of the owls are their eyes, the thick white fabric that I used already had a tendency to fray to I used that to my advantage and purposely frayed the edges of the eyes more. It was easy as running my nail a few times over the edge of the fabric.

Now I just need to finish sewing the straps and back on so that it's a complete pillow and not a bunch of small pieces. I also need to go find some great buttons for this (I will be using a button closure for this).
For now, I hope you are all enjoying some crafts and the great weather - it's a beautiful 60 degrees here in Chicago.
-Meg
Friday, March 12, 2010
Bit of a mishap...
I have to learn to pay more attention to what I'm doing because one minute I'm sewing my pillow and the next I'm undoing my work because I've sewn it to my pants. Shoot!
-M
p.s. The cable and internet are out at the apartment though, so it'll give me plenty of time to finish up the pillow cover and if I'm really productive maybe the pillow form, but let's not get ahead of ourselves. One day I will figure out the sewing machine I bought off craigslist, but for now it's up to my hands to do all the work.
Tuesday, March 9, 2010
Here we go again...
I began my bird pillow again. Here's hoping I don't loose various pieces as I had before. I wanted to make an 11x17 pillow, so I measured the front and back pieces with a 1/2" border and then sketched out the tree branch on stiff white linen and transferred it over to the brown flannel casual wear fabric that I bought at Vogue Fabrics a while ago.


I have yet to finesse the technique of holding a pinned together project without stabbing my hands a million times, so my poor hands look like I ran them through rose bushes. Oh well...
Once I had pinned the tree branch on I began sewing it and the little bird on...


I still have to finish this little bird by adding the feet, beak, and wings as well as add a second, larger one beside it. Then I'll sew on the back and I think I'm going to button close this on the side...so we'll see how that turns out as I have no fully thought it out just yet. I'll also have to make a pillow form for this since. I will finish this bird, and hopefully the larger one as well by the end of tonight.
-Meg
Snip snip!
Pinned and ready to go...
I have yet to finesse the technique of holding a pinned together project without stabbing my hands a million times, so my poor hands look like I ran them through rose bushes. Oh well...
Once I had pinned the tree branch on I began sewing it and the little bird on...

I love contrasting thread.
Not quite finished and trimming is desperately needed...
-Meg
Subscribe to:
Posts (Atom)